Continuing with the topic of Wear OS development, in a previous article, we discussed the fundamentals of Wear OS development. If you haven’t seen it, I suggest you check that article out and then come back here.
📲 Building a Connected Wear OS App: Overview
In this blog, we explore how to build a Wear OS app that communicates effectively with its companion Android app. Seamless communication is key to keeping both apps in sync, and Android provides us with three main tools to achieve this—such as DataClient, MessageClient, and CapabilityClient.
We cover the two main ways of receiving data with DataClient:
- Using
WearableListenerService: This allows you to listen for messages globally, even if the app is closed. By overriding methods likeonMessageReceived()and registering the service in theAndroidManifest.xml, your app can handle incoming messages automatically. - Adding Listeners Locally: Alternatively, you can set up listeners directly in classes like
Activity,Fragment,Service, orViewModel, giving you more scoped and flexible control over communication.
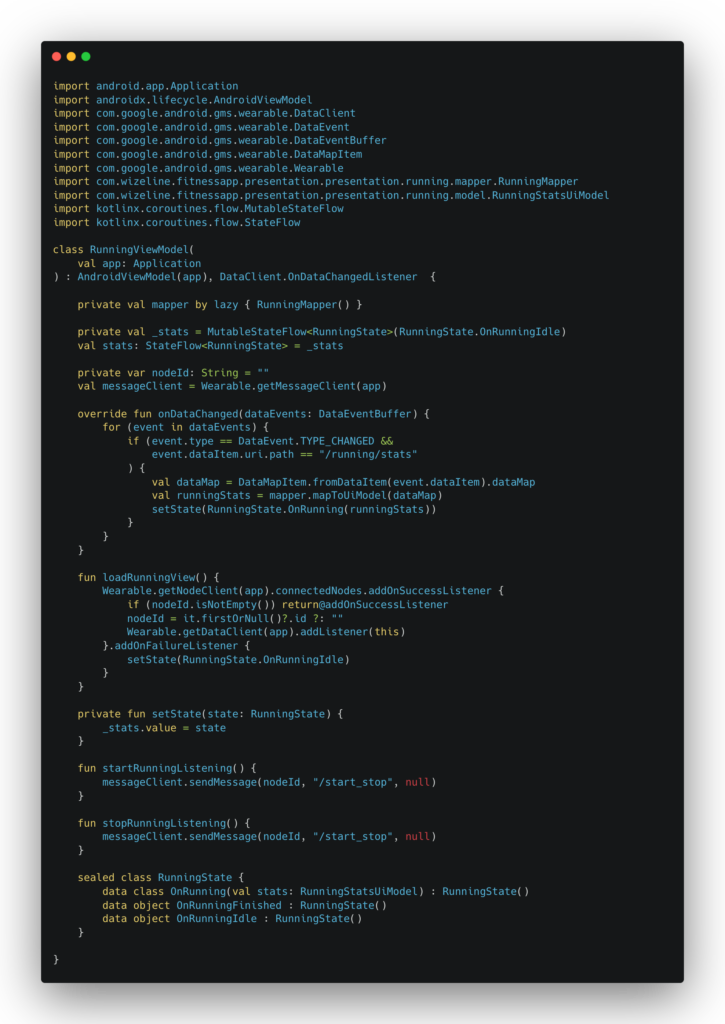
We demonstrate this with an example in the RunningViewModel, where we listen for both onDataChanged() and onMessageReceived() events, keeping the app reactive and synchronized.
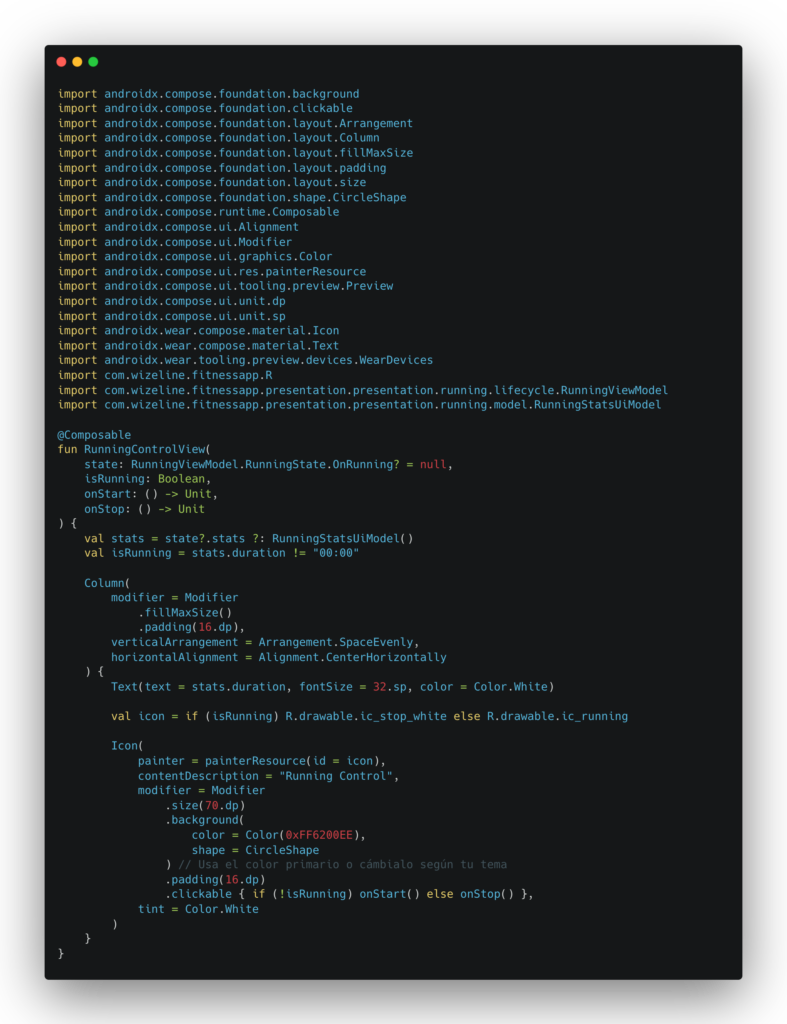
To send messages from the Wear app to the phone, we use the MessageClient and its sendMessage() method, which takes three parameters: the node ID, a path (like "/start_stop"), and the message data. For example, sending the "/start_stop" command triggers the simulator to start or stop tracking data.
We also introduce the RunningActivity.kt, which features a HorizontalPager UI to provide a smooth, scrollable interface for navigating between views.
By combining all these tools, we demonstrate how to build a simple but fully connected Wear OS app that syncs effectively with its Android phone counterpart.
Project structure
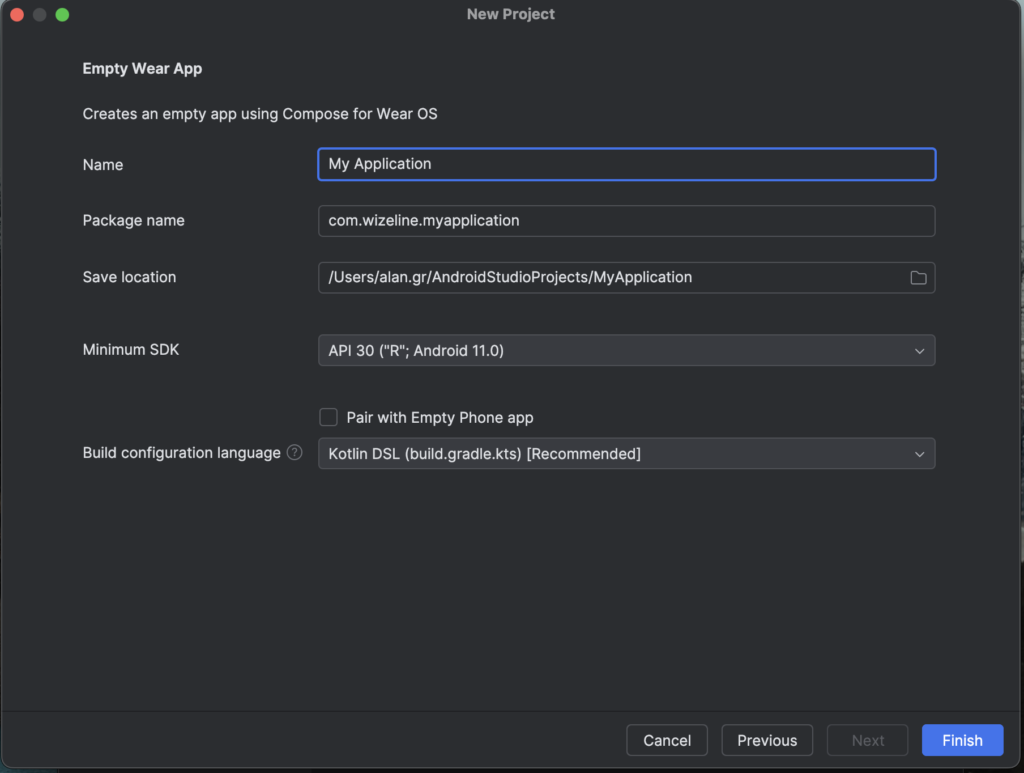
To start developing Wear, the initial setup in Android Studio doesn’t change much. In the New Project > Wear OS section, we can find these main options [Wear App + Tile or Empty Wear App].
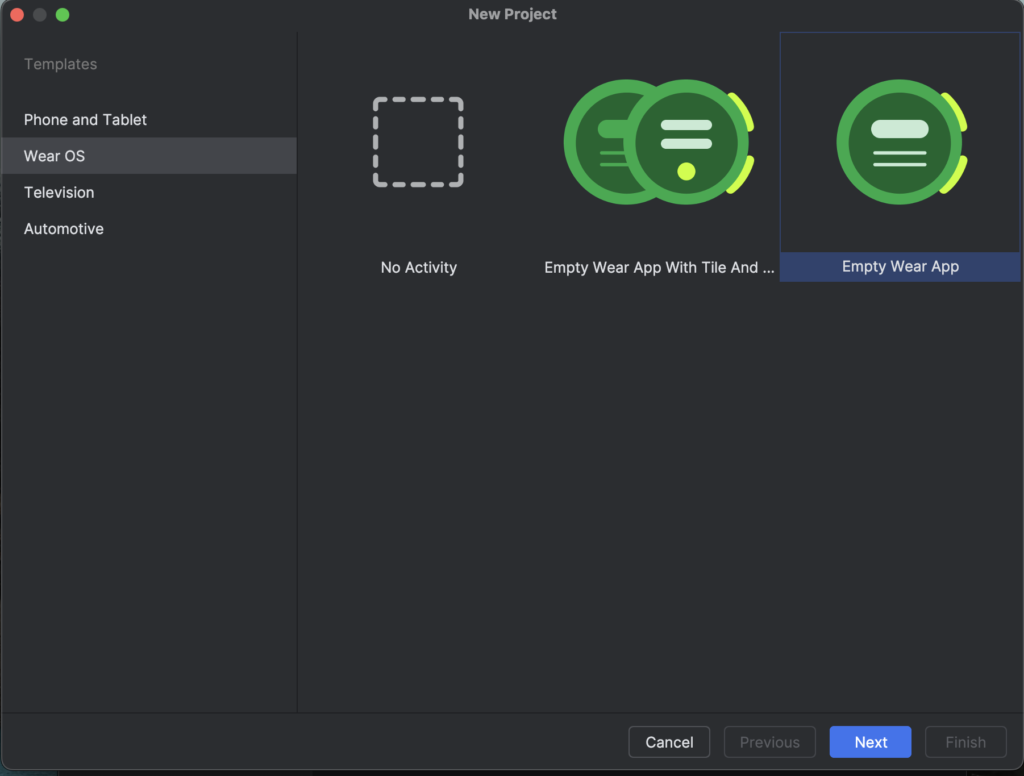
By selecting one of these two options, we will have the initial configurations of the application or the project itself. This step is crucial, depending on whether our app will work standalone or in conjunction with the companion and wear app. We also explained this in the previous article.
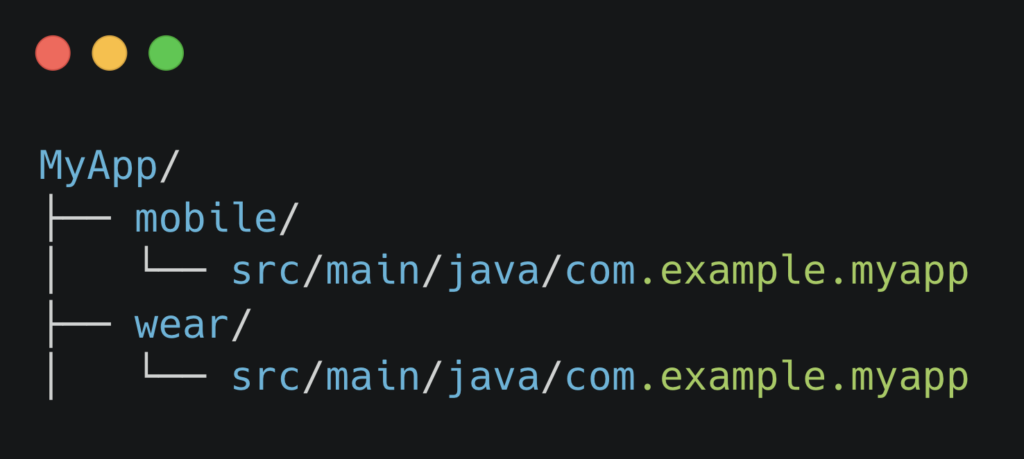
⚠️ For standalone mode, we will not have any limitation for the package name, we will have total freedom to choose any package name, however if our app will work in companion + wear app mode, the package name of our wear app must match the package name of our android app, this is important because later we will see how the internal communication between wear app and companion app is.
| standalone | companion + wear app |
| Does not matter | package name for both projects “com.wizeline.myapp” |
 |  |
Having said that, we can click on “Finish” and our IDE will open as if it were an Android project.
👨💻 Start developing
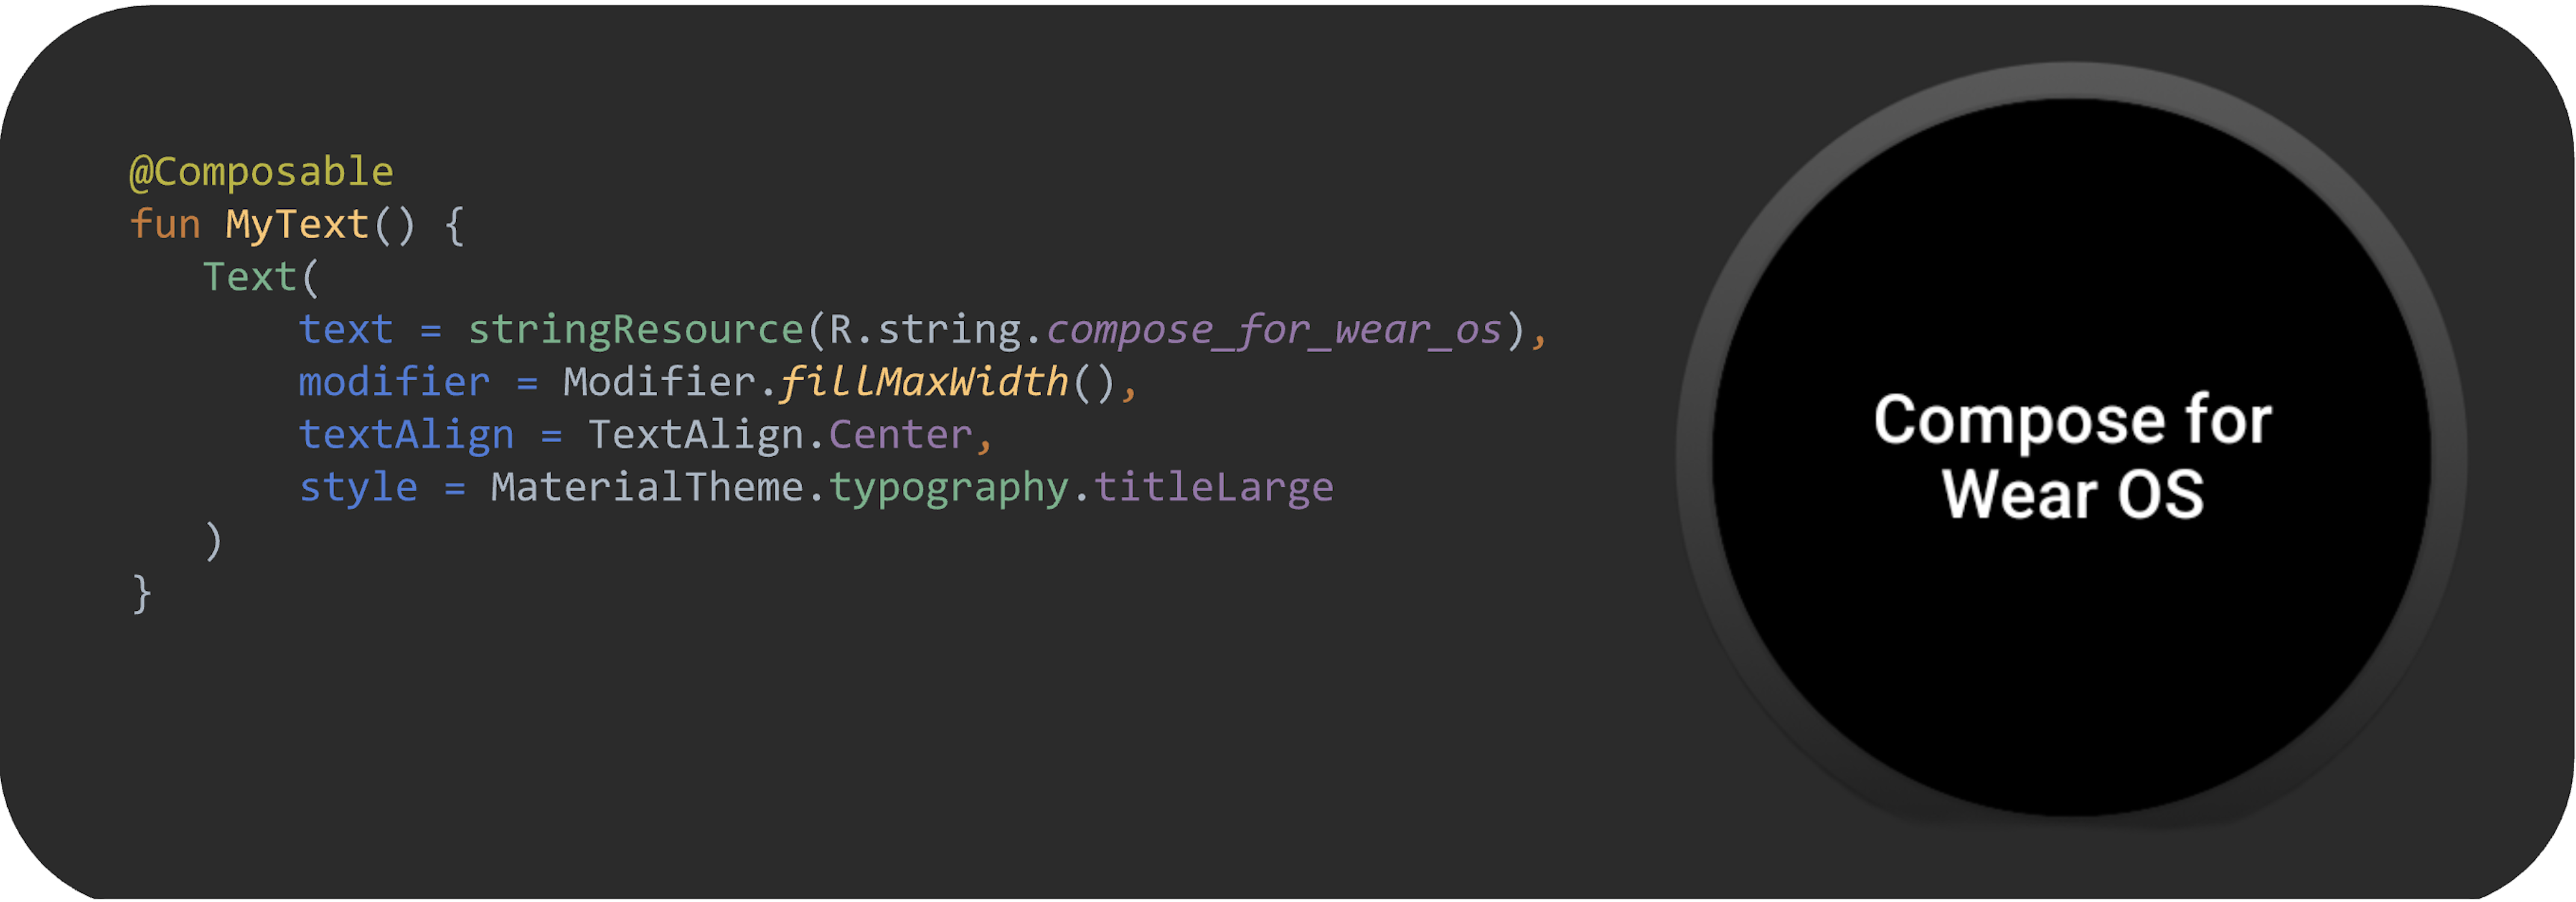
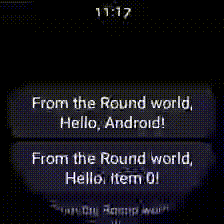
Once the project is properly configured, we’ll have an empty activity with the traditional Android Studio composable Greeting template.
We’ll notice that our class inherits/extends ComponentActivity, which tells us our app is ready for Jetpack Compose, the declarative UI supported by androidx.wear.compose.
📡 Communication with the companion app
A fundamental part of building our app, along with the phone app, is enabling good communication between these two components, allowing us to keep their states in sync. For this, Android provides us with three main agents:
DataClient(for persistent data sync)MessageClient(real-time one-shot messages)CapabilityClient(feature discovery)
DataClient/MessageClient
Provides an API for reading and writing data items and assets across devices in an Android Wear network (commonly Bluetooth).
Follows a producer-consumer pattern: one node is responsible for creating a data item, and a second node is responsible for deleting it once it has been processed. Data items should have unique IDs when using this pattern, and data items should not be modified once created.
There are two ways to send and receive information using DataClient. We can listen to events globally throughout the entire application by creating a class that extends WearableListenerService and registering it in our AndroidManifest.xml file.
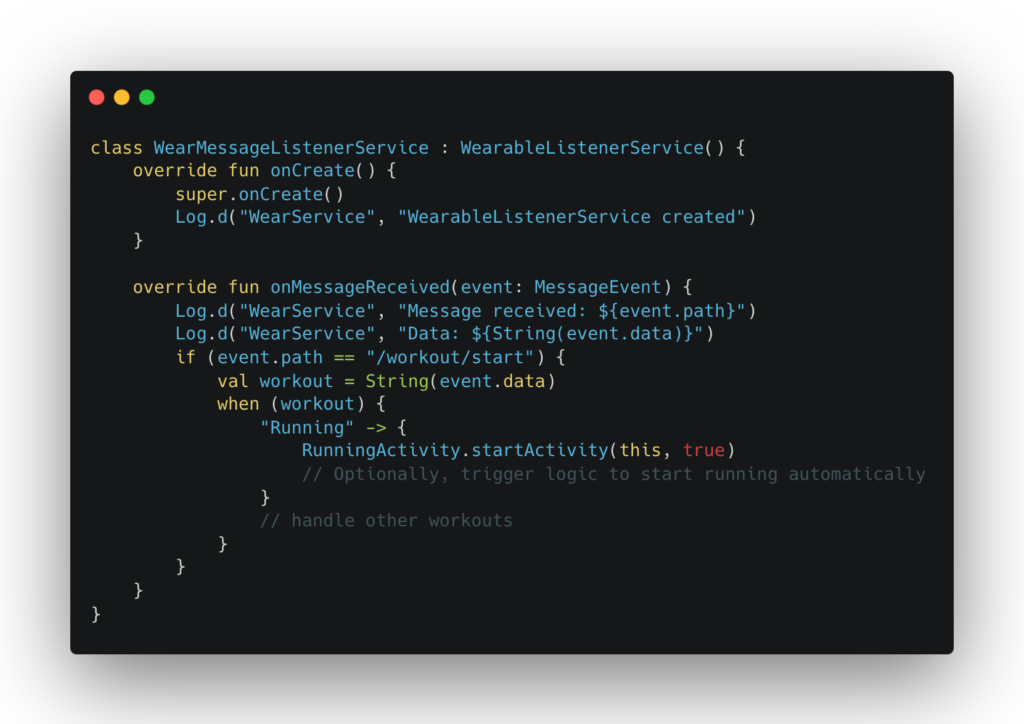
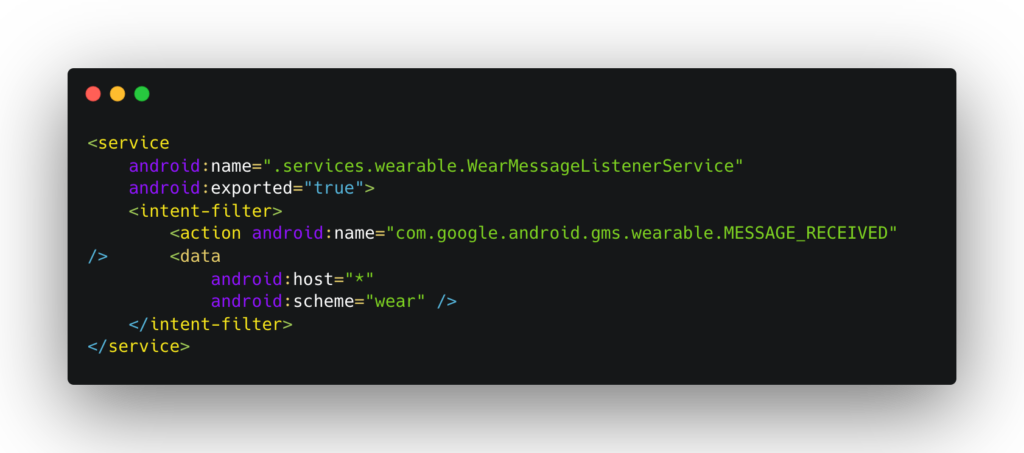
In this way, the service automatically listens for messages that may be sent from a sender through the onMessageReceived(event: MessageEvent) method. This method will receive any message coming from a valid sender (a Wear app with the same package name as the phone app), and it can even launch the app if it’s not currently running.
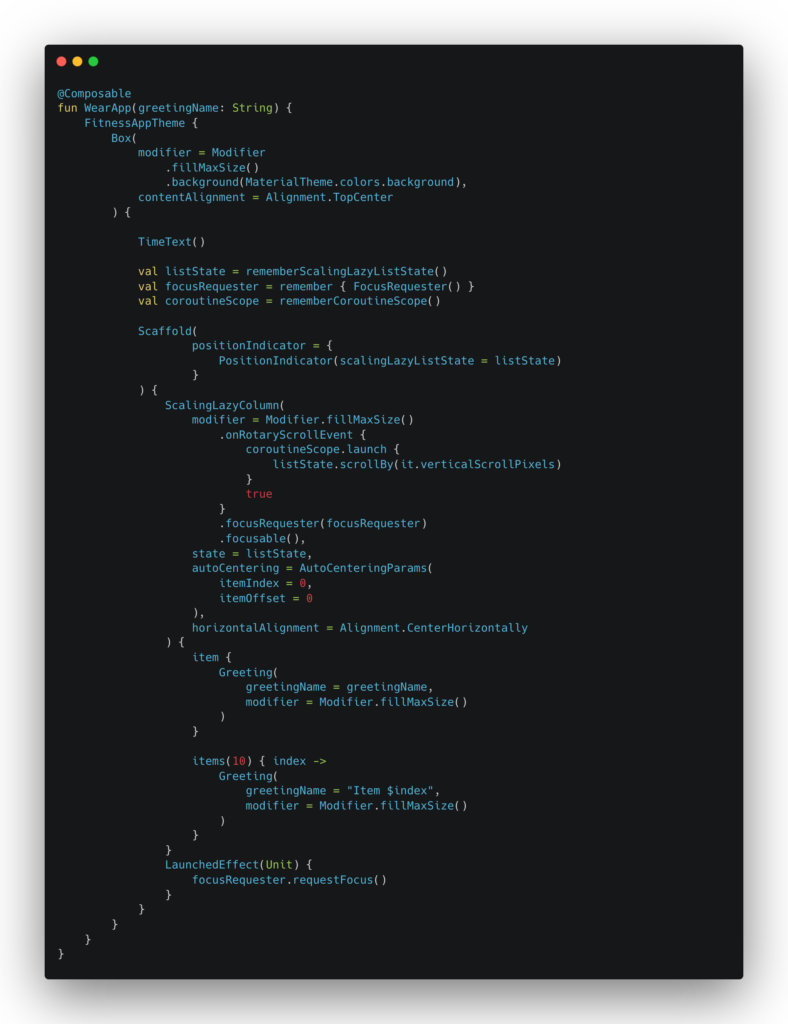
Another way to listen for messages is without setting up a service, by creating a listener in a specific class—this can be an Activity, Fragment, Service, ViewModel, etc., as we’ll see below:
In this example, we are listening for messages and data items in the ViewModel, which allows us to maintain a reactive state based on the changes received from the app—delivered, in this case, to the ViewModel on the watch.
We can notice a couple of things. The onDataChanged method is designed to receive a data buffer composed as follows:
- DataItem: class that contains:
- Uri is most commonly used to define a listening path to identify the producer.
- byte[] as DataItem itself, which contains DataMap; this DataMap is used as a table to pass all parameters needed from producer, such as Int, String, Double, Float, Parcelable, etc.
- Map<String, DataItemAsset> to send larger objects, such as images and music.
- Type =
int TYPE_CHANGED = 1 notifies a data update from the producer.
int TYPE_DELETED = 2 notifies a data deletion from the producer.
In the case of onMessageReceived, we receive an object like this:
- Path: String object to define a listening path to identify the producer.
- SourceNodeId: Returns a non-null unique ID for the device that sent the message in a Wear OS network.
- Data: Byte array to pass serialized objects.
Below, you can see different scenarios for producer-consumer pattern:
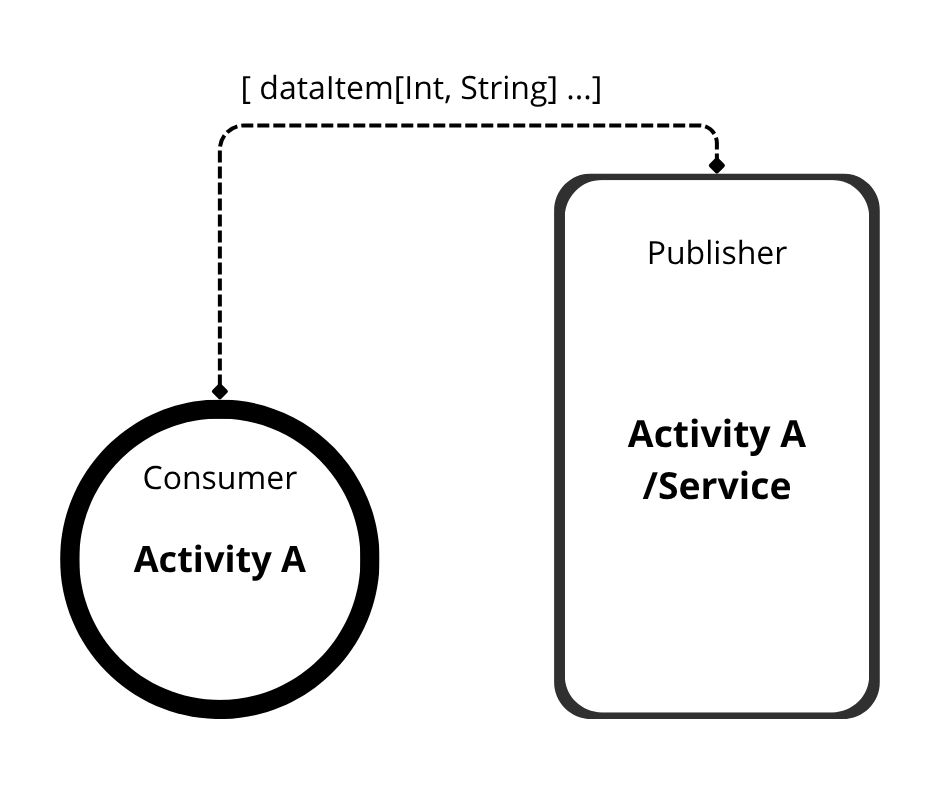
In this scenario, the watch is listening to the established route or path
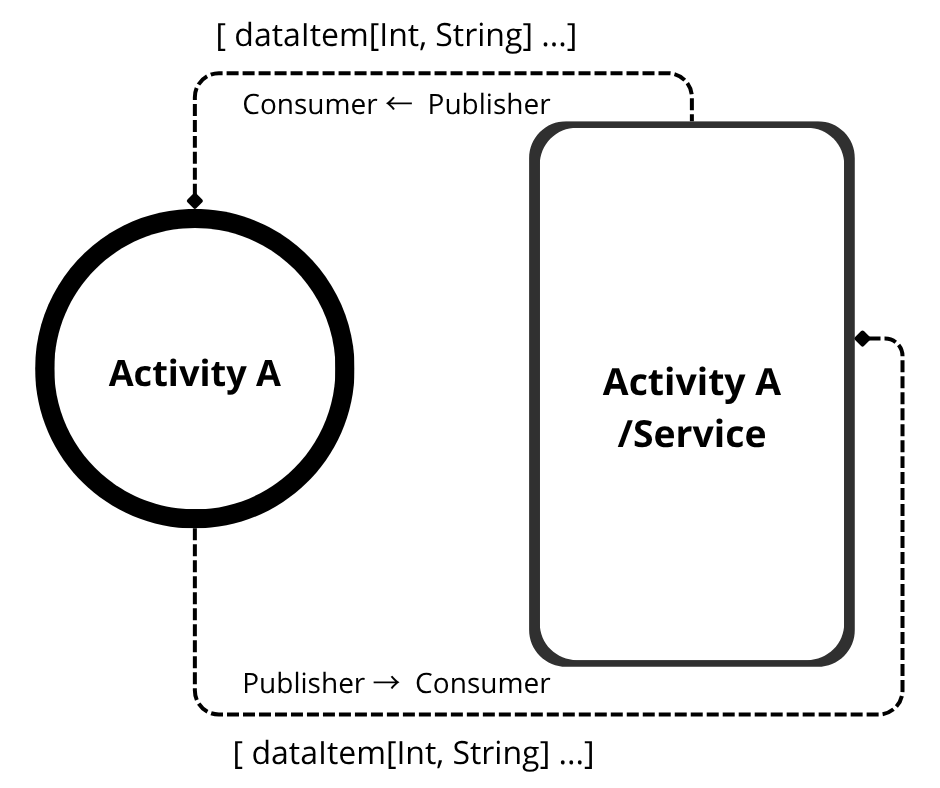
A second scenario, as we will see below, is when…
Having a two-way communication, where both subjects can act at the same time as consumers/producers whether messages or data.
Having explained this, let’s look at an example from the Fitness app where we’ll show how data is synchronized from the companion app to the Wear app.
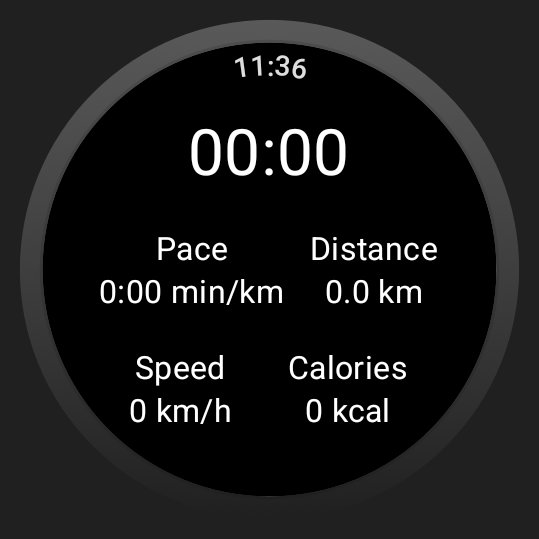
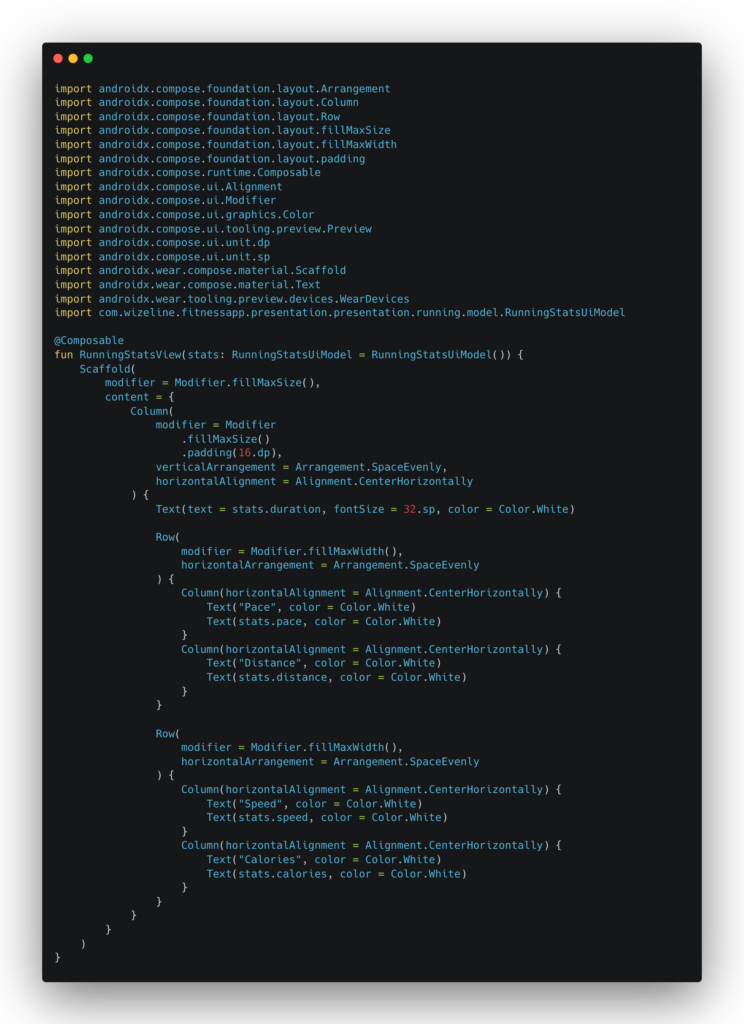
We create the RunningActivity.kt, where we build the following UI. On one side, we see a HorizontalPager, a component that allows us to handle pages within an activity, enabling horizontal scrolling, as if it were navigation.

Within this, we have two more composables: RunningStatsView y RunningControlView
RunningControlView
RunningStatsView
Here you can see the ViewModel attached to RunningActivity, called RunningViewModel. As you can see, it implements DataClient in order to listen for data from the test app, Fitness app.

Here’s the translation:
Likewise, we’ve created the variable messageClient, which holds the instance of MessageClient. This allows us to send messages in the form of commands from the Wear app to our companion app. We achieve this by calling the sendMessage method on messageClient, which takes three parameters:
- nodeId = node identifier (as we saw before, the node is the active connection to a companion phone).
- String: where we will send our value in a text string.
- byte[]: where you can send data in the form of a bytearray.
So, as we can see, I send the node id of my current companion device, and I send it the following message “/start_stop”.
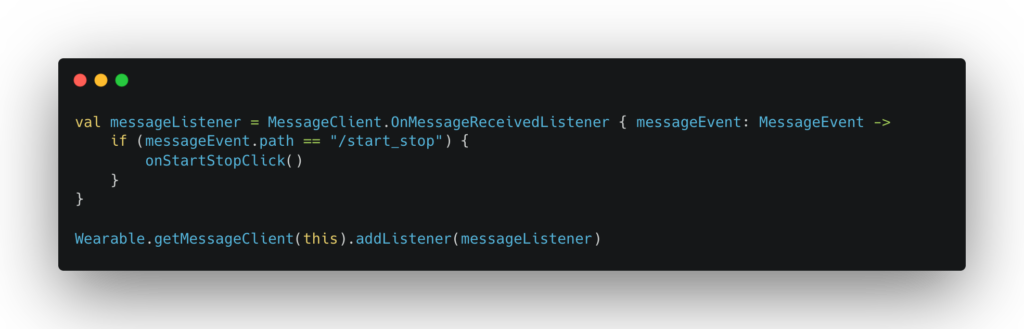
Next, we’ll see how the app on the companion device is listening to our MessageClient:
Here’s the translation:
As you can see, by listening for the message path "/start_stop", we are calling the onStartStopClick() method, which we use to start or stop the running data simulator.
In this way, we can create a simple Wear OS app synchronized with an Android app on the phone.
References/Links
- https://developer.android.com/training/wearables/data/messages
- https://developer.android.com/training/wearables
- https://developer.android.com/training/wearables/data/sync
- https://developer.android.com/training/wearables/apps/standalone-apps
- https://developer.android.com/training/wearables/compose
💬 Your thoughts?
Building a Wear OS app too? Share your experience or questions in the comments — let’s connect! 👇
Leave a Reply